
.htaccess Tutorial
In this tutorial, you will find out about the .htaccess file and its power to improve your website. Bluehost supports .htaccess files; however, as a customer, you are responsible for what is in this file and how it changes your site.
Creating a .htaccess File
You can create a .htaccess file on your local computer or the server.
On your computer
Windows: Using Notepad, save the file as .htaccess. Mac OS X: Using TextEdit, save the file as ".htaccess.
Note: If you save the file as .htaccess, it will be hidden, and you will not be able to see it in the Finder.
Using your preferred FTP client, upload the file to the server. The .htaccess file will need to be in the folder where your site is located, typically the public_html folder. To know more about this, please see File Manager - How to Upload Files.
On the server
Note: The Advanced tab will load your cPanel. Legacy accounts will feature a horizontal navigation bar at the top of the screen, while Bluerock account users will see a vertical navigation menu on the left-hand side of the screen. To learn more, please see Bluerock vs. Legacy.
Bluerock
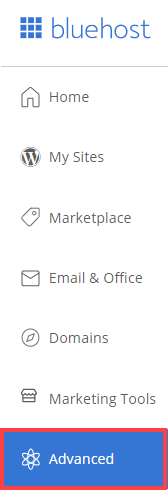
- Log in to your Bluehost control panel.
- Click the Advanced tab on the left-hand side menu.
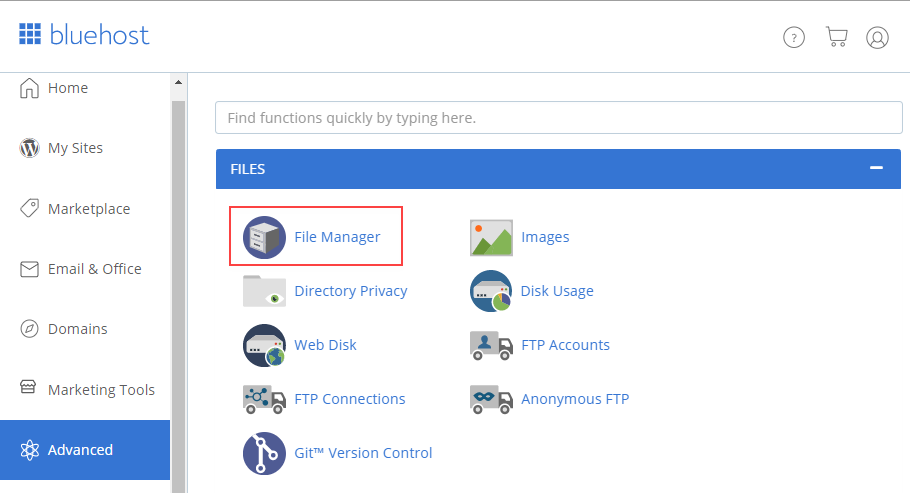
- Under the File section, click the File Manager icon.
- Look for the Settings button located towards the upper right corner of your screen.
- From here, click the Preferences popup, then click the checkbox for Show Hidden Files (dotfiles).
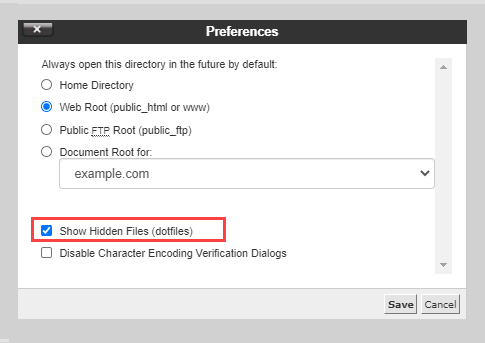
- Click the Save button when finished.
- Click the File icon to create a new file, and name it .htaccess.
Legacy
- Log in to your Bluehost control panel.
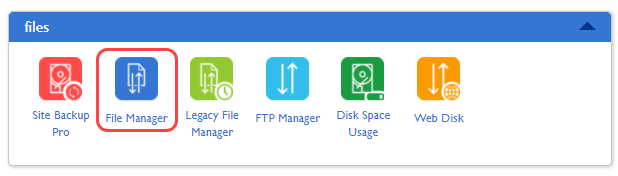
- Click the File Manager icon located in the file section.
- From the file manager popup settings, choose the folder you would like to open, most often the WebRoot (public_html/www).
- Under the Preferences, make sure the Show hidden files are checked.
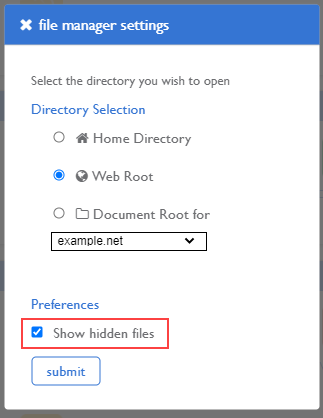
Note: If you do not see this popup, you will need to click the reset all interface settings link at the bottom of the cPanel page.
- Click the Submit button.
Note: If you are in the File Manager already, you can add &showhidden=1 to the end of the URL.
- Click the New File icon to create a new file and name it .htaccess
Editing a .htaccess File
You may need to edit the .htaccess file at some point for various reasons. This article covers how to edit the file but not what to change. (You may need to consult other articles and resources for that information.)
There are many ways to edit a .htaccess file.
- Edit the file on your computer and upload it to the server via FTP.
- Use an FTP program's Edit Mode that allows you to edit a file remotely.
- Use SSH and a text editor to edit the file.
- Use the File Manager in cPanel to edit the file.
The fastest and easiest way to edit a .htaccess file for most people is to use the File Manager in cPanel. This article covers how to edit it using this method. Read further sections for some common .htaccess edits.
How to Edit .htaccess in cPanel's File Manager
Before we do anything, it is suggested that you backup your website so that you can revert to a previous version if something goes wrong.
Note: The Advanced tab will load your cPanel. Legacy accounts will feature a horizontal navigation bar at the top of the screen, while Bluerock account users will see a vertical navigation menu on the left-hand side of the screen. To learn more, please see Bluerock vs. Legacy.
To edit the .htaccess file, first, you will need to open the File Manager.
Bluerock
- Log in to your Bluehost control panel.
- Click the Advanced tab on the left-hand side menu.
- Under the File section, click the File Manager icon.
- Look for the Settings button located towards the upper right corner of your screen.
- From here, click the Preferences popup, then click the checkbox for Show Hidden Files (dotfiles).
- Scroll to locate the .htaccess file from the list.
- Right-click on the file, then click on Edit from the menu.
- A dialogue box may appear asking you about encoding; just click on the Edit button to continue. The editor will open in a new window.
- Edit the file as needed, then click the Save Changes button.
- Test your website to make sure it has the desired effect. If not, correct the error or revert to the previous version until your site works again.
Legacy
- Log in to your Bluehost control panel.
- Click the File Manager icon located in the file section.
- From the file manager popup settings, choose the folder you would like to open, most often the WebRoot (public_html/www).
- Under the Preferences, make sure the Show hidden files are checked.
Note: If you do not see this popup, you will need to click the reset all interface settings link at the bottom of the cPanel page.
- Click the Submit button.
- The File Manager will open in a new tab or window.
- Look for the .htaccess file in the list of files. You may need to scroll to find this file.
- Right-click on the file and click on Code Edit from the menu. (Alternatively, you can click on the icon for the .htaccess file and then click on the "Code Editor" icon at the top of the page.)
- A dialogue box may appear asking you about encoding. Just click on the Edit button to continue.
The editor will open in a new window. - Edit the file as needed.
- Click on the Save Changes button in the upper right-hand corner when done.
The changes have been saved. Test your website to make sure it has the desired effect. If not, correct the error or revert to the previous version until your site works again. - Once complete, you can click Close to close the window.
Alternative Index Files
You may not always want to use index.htm or index.html as your index file for a directory; for example, if you are using PHP files in your site, you may want index.php to be the index file for a directory. You are not limited to 'index' files, though. Using .htaccess, you can set foofoo.blah to be your index file if you want to!
Alternate index files are entered in a list. The server will work from left to right, checking to see if each file exists; if none of them exist, it will display a directory listing (unless, of course, you have turned this off).
DirectoryIndex index.php index.php3 messagebrd.pl index.html index.htm
Custom Error Pages
You can customize your personal error pages (for example, when a file is not found) instead of using Bluehost's error pages or not having an error page. This will make your site seem much more professional.
You can use custom error pages for any error as long as you know its number (like 404 for page not found) by adding the following to your .htaccess file:
ErrorDocument errornumber /file.html
For example, if I had the file notfound.html in the root directory of my site and I wanted to use it for a 404 error, I would use:
ErrorDocument 404 /notfound.html
If the error page is not in the root directory of your site, you can enter the path to the file:
ErrorDocument 500 /errorpages/500.html
These are some of the most common errors:
401 - Authorization Required
400 - Bad request
403 - Forbidden
500 - Internal Server Error
404 - Wrong page
Stop a Directory Index From Being Shown
Sometimes, for one reason or another, you will have no index file in your directory. This will, of course, mean that if someone types the directory name into their browser, a full listing of all the files in that directory will be shown. This could be a security risk for your site.
To prevent this (without creating lots of new 'index' files), you can enter a command into your .htaccess file to stop the directory list from being shown:
# disable directory browsing

Options ExecCGI Includes IncludesNOEXEC SymLinksIfOwnerMatch -Indexes

# enable directory browsing
Options All +Indexes
Deny/Allow Certain IP Addresses
Allow those people only with specific IP addresses to access your site, for example, people using a particular network to get into a specific directory. You may also ban other IP addresses, for example, keeping disruptive members out of your message boards. It will only work if you know the IP addresses you would like to ban.
Please keep in mind that most ISP's use dynamic IP addresses, so this is not always the best way to limit/grant access.
Block an IP Address
#Deny List

order allow,deny
deny from 123.123.123.123 #specify a specific address
deny from 123.123.123.123/30 #specify a subnet range
deny from 123.123.* #specify an IP address wildcard
allow from all
Allow only Certain IP Addresses
#Allow List

order deny,allow
allow from 123.123.123.123 #specify a specific address
allow from 123.123.123.123/30 #specify a subnet range
allow from 123.123.* #specify an IP address wildcard
deny from all
Note: This will still allow scripts to use the files in the directory.
Redirection
There is a tool in the cPanel that can create the Redirects for you. Please see How to create a Redirect.
Redirect from a specific file to a new file
Example:
Redirect /redirect_from.html http://www.newsite.com/folder/redirect_to.html
In the above example, a file in the root directory called redirect_example.html is redirected to the URL http://www.newsite.com/folder/redirect_example.html.
If the old file were in a subdirectory, then you could use:
/subdirectory/redirect_from.html
WildCard Redirect / Redirecting from one folder to a new folder
Redirect /redirect_from http://www.newsite.com/redirect_to
Now any request to your site below /old directory will be redirected to the new site, with the extra information in the URL added on, for example, if someone typed in:
http://www.example.com/redirect_from/images/image.gif
They would be redirected to:
http://www.newsite.com/redirect_to/images/image.gif
Redirecting (URL Rewriting) with Joomla
To enable URL Rewriting in Joomla, you will need to copy and paste the following code into your .htaccess file.
# For security reasons, Option FollowSymlinks cannot be overridden.
#Options +FollowSymLinks
Options +SymLinksIfOwnerMatch
Mod_Rewrite
Mod Rewrite allows you to change the URL that everyone sees when visiting your domain or a specific address. Just add the code to your .htaccess file (typically the one inside public_html).
Please remember we do not offer support to code this, nor do we promise to make your code work. Some of these codes work in combination, and some do not.
EXAMPLES
#Specify a default home page (index page)
DirectoryIndex home.html
#Allow only specified IPs to access your site
deny from all
allow from 64.95.219.140
allow from 210.23.45.67
# Redirect all pages from olddomain.com
# to newdomain.com
Options +FollowSymLinks
RewriteEngine on
RewriteCond %{HTTP_HOST} ^www.olddomain.com$ [OR]
RewriteCond %{HTTP_HOST} ^olddomain.com$
RewriteRule ^(.*)$ http://www.newdomain.com/$1 [R=301,L]
#Prevent subfolder loading. This goes
# in htaccess for the primary domain
RewriteCond %{HTTP_HOST} ^primary.com$ [OR]
RewriteCond %{HTTP_HOST} ^www.primary.com$
RewriteRule ^addon.com/?(.*)$ "http://www.addon.com/$1" [R=301,L]
#Prevent subdomain name loading.
#This goes in htaccess for the primary domain
RewriteCond %{HTTP_HOST} ^subname.primary.com$ [OR]
RewriteCond %{HTTP_HOST} ^www.subname.primary.com$
RewriteRule ^(.*)$ "http://www.addon.com/$1" [R=301,L]
# Never use www in the domain
# Replace 'example.com' with your domain name
RewriteEngine on
RewriteCond %{HTTP_HOST} ^www.(([a-z0-9_]+.)?example.com)$ [NC]
RewriteRule .? http://%1%{REQUEST_URI} [R=301,L]
# Always use www in the domain
# Replace 'example.com' with your domain name
RewriteEngine on
RewriteCond %{HTTP_HOST} ^([a-z.]+)?example.com$ [NC]
RewriteCond %{HTTP_HOST} !^www. [NC]
RewriteRule .? http://www.%1example.com%{REQUEST_URI} [R=301,L]
# Set a default home directory, (this subfolder always loads)
# Replace 'folder' with your subfolder name
<IfModule mod_rewrite.c>
RewriteEngine On
RewriteRule ^$ /folder/ [R=301,L]
</IfModule>
# Rename a directory and force visitors to the new name
# Replace 'old' with your old folder name
# Replace 'new' with your new folder name
RewriteEngine on
RewriteRule ^/?old([a-z/.]*)$ /new$1 [R=301,L]
# Always use https for secure connections
# Replace 'www.example.com' with your domain name
# (as it appears on your SSL certificate)
RewriteEngine On
RewriteCond %{SERVER_PORT} 80
RewriteRule ^(.*)$ https://www.example.com/$1 [R=301,L]
# Block traffic from multiple referrers
RewriteEngine on
Options +FollowSymlinks
RewriteCond %{HTTP_REFERER} badsite.com [NC,OR]
RewriteCond %{HTTP_REFERER} badforum.com [NC,OR]
RewriteCond %{HTTP_REFERER} badsearchengine.com [NC]
RewriteRule .* - [F]
#Do not allow these file types to be called
RewriteEngine on
RewriteRule .*.(jpg|jpeg|gif|png|bmp|exe|swf)$ - [F,NC]
Guides to dot-htaccess coding:
- javascriptkit.com
- apache.org
- modrewrite.com
- Great resource for mod rewrite lessons.
- Great resource for mod rewrite examples.
Password Protection
One of the many uses of the .htaccess is protecting the password directories on websites reliably.
Note: If you would like to use the cPanel tool to password-protect your folders, please see our article: Password Protect a folder on your website.
The .htaccess File
Adding password protection to a directory using .htaccess takes two stages. The first part is to add the appropriate lines to your .htaccess file in the directory you would like to protect. Everything below this directory will be password protected:
AuthName "Section Name"
AuthType Basic
AuthUserFile /home/username/.htpasswds
Require valid-user
There are a few parts of this which you will need to change for your site. You must need to replace the Section Name with the name of the part of the site you are protecting (e.g., "Members Area").
The /home/username/.htpasswds should be changed to reflect the full server path to the .htpasswds file (more on this later). If you do not know the full path to your webspace is, check your Bluehost cPanel. Look on the left "stats" column of the cPanel.
The .htpasswds File
Password protecting a directory takes a little more work than any of the other .htaccess functions because you must also create a file to contain the usernames and passwords which are allowed to access the site. These should be placed in a file which (by default) should be called .htpasswd. This can be placed anywhere within your website (as the passwords are encrypted), but it is advisable to store it outside the web root (in your home directory) so that it is impossible to access it from the web.
Entering Usernames And Passwords
Once you have created your .htpasswd file (you can do this in a standard text editor), you must enter the usernames and passwords to access the site. They should be entered as follows:
username:password
The format of the password is encrypted. There is a recommended simulator you can use, which is the KxS site. This simulator will allow you to enter the username and password. It will generate an output in the correct format.
For multiple users, just add extra lines to your .htpasswd file in the same format as the first.
Accessing The Site
When you try to access a site that has been protected by .htaccess, your browser will pop up a standard username/password dialog box. Alternatively, you can send the username and password (unencrypted) in the URL as follows:
http://username:password@www.website.com/directory/
Fix ExecCGI
Open the .htaccess file located in the public_html/addondomain/ directory in the File Manager, and enter this line:
Options ExecCGI
Click the Save button at the bottom of the screen, and you are done!
Restart Apache
You will not need to restart Apache, and then after that, you need to "hard refresh" your web page to see the changes. Browse your site and go to the page that should be affected. Then hit Ctrl + F5 to refresh everything. (Some computers require the F Lock to be on before you can use F5.) Now you should see your new .htaccess code take effect.
Alternatively, you can clear your browser's cache, close the browser, relaunch the browser, and try your web page again.
Safari users: Safari will require you to use the cmd + R hotkey for Safari 3 and below. Safari 4 and above will require that you hold shift and click the refresh icon next to your address bar.
If you need further assistance, feel free to contact us via Chat or Phone:
- Chat Support - While on our website, you should see a CHAT bubble in the bottom right-hand corner of the page. Click anywhere on the bubble to begin a chat session.
- Phone Support -
- US: 888-401-4678
- International: +1 801-765-9400
You may also refer to our Knowledge Base articles to help answer common questions and guide you through various setup, configuration, and troubleshooting steps.