
cPanel: How to Migrate Email Accounts
Overview
This article will walk you through how you can transfer your email accounts from one cPanel to another. This process is also known as Email Account Migration.
- Step 1: Prepare your new cPanel
- Step 2: Download the files from your old cPanel
- Step 3: Transfer - Upload your files to your new cPanel
- Step 4: Update the DNS
- Step 5: Send a Test Mail
Legend:
cPanel A = Server that the email account is currently on and will soon be moved from.
cPanel B = Server that you want to move the email account to.
Step 1: Prepare your new cPanel
Re-create the email account in your cPanel B.
Important Note:
- Make sure to use the same email address and its corresponding password for every account that you're migrating
- Make sure to update the quota size as well.
Step 2: Download the files from your old cPanel
Log in to your cPanel A where the current email accounts are operating. You can retrieve your files in 2 ways: Using FTP or directly via File Manager.
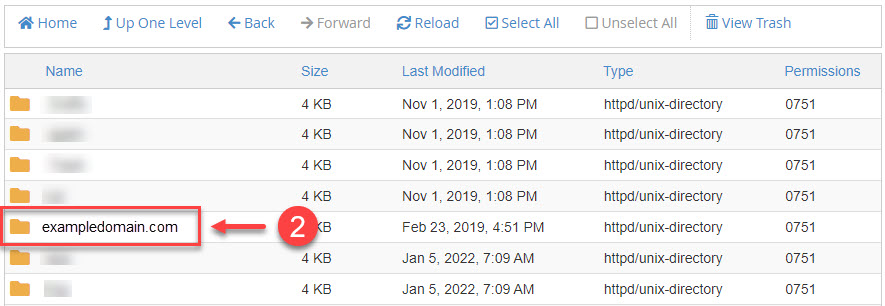
From the root directory, navigate to ① mail → ② click the folder of the domain in question (yourdomain.com) → ③ hit on the next folder whose name is the user email account in question (johnsmith).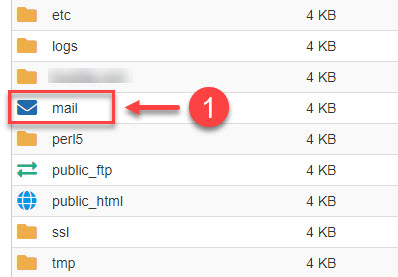

You will be able to see a bunch of files inside it, but all you really need to copy are the new and cur directories (the maildirsize file is only optional, but is highly suggested to be included).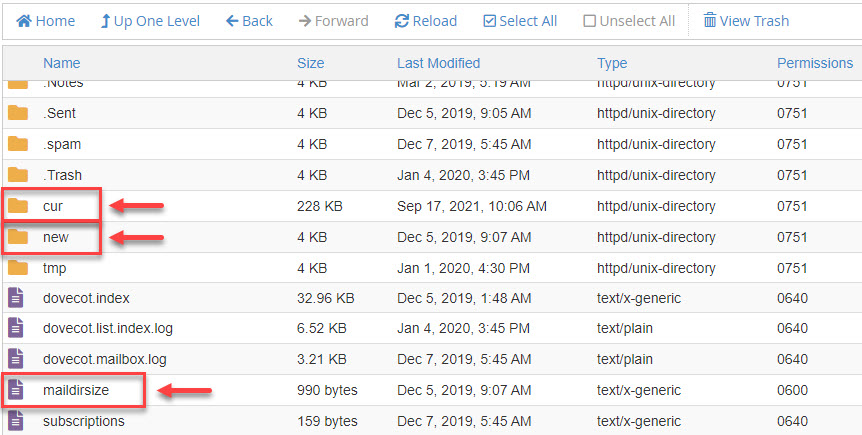
For instructions on how to download these, please see How to Compress Files into an Archive (GZip).
Note: If you have a lot of emails, this could take a while.
Step 3: Transfer - Upload your files to your new cPanel
Ready all the files you downloaded in step 2, upload the new, cur, and maildirsize to cPanel B root directory: mail → yourdomain.com → user-email-account. The folders should be automatically created when you accomplish the instructions in step 1. You can upload files in 2 ways: Using FTP or directly via File Manager.
If you have a compressed file (zip file), make sure to extract it after the upload process.
Note: This step might also take a while, depending on the size of the email accounts being migrated.
Step 4: Update the DNS
Once you're done following the steps above, all the necessary files should have been migrated. The last step would be to point your DNS records to the new server (cPanel B) in order for the mails to operate there from that point on. For instructions on how-to do this, please see DNS Management: How to Add, Edit, or Delete DNS Entries or DNS Management - How To Edit MX Records.
If you only want to transfer email operations to the new server, all you need to change is the MX record, but if you have both your website and emails operating on the same new server, we suggest you update the nameservers.
Note: When you update your records, it could take up to 24 hours to take effect; this is called propagation.
Step 5: Send a Test Mail
After the propagation time, it will be best to send a test email to the accounts you migrated to see if they were successfully transferred and are functioning well on the new server.
If you need further assistance, feel free to contact us via Chat or Phone:
- Chat Support - While on our website, you should see a CHAT bubble in the bottom right-hand corner of the page. Click anywhere on the bubble to begin a chat session.
- Phone Support -
- US: 888-401-4678
- International: +1 801-765-9400
You may also refer to our Knowledge Base articles to help answer common questions and guide you through various setup, configuration, and troubleshooting steps.